Showing posts with label stuff to do with kids. Show all posts

Tuesday, May 4, 2010

Word games


It has become a routine to me to go for a walk every day just before dinner time with both my little man and little bear. Little man is in his buggy but little bear has to walk. (In the photo above that is obviously not me walking with her. But I thought the picture is so cute ... ) We usually choose the same route every time and as just walking is not the most exciting thing to a 4 year old I am often thinking of games or other stuff we could do on our walks to keep her entertained and just make it more interesting. We had already tried things like "I spy". She loves I spy. But it's kinda hard playing I spy when you yourself are moving as you might be moving away from the object that you are spying ... :-) And it becomes especially hard if one person who is playing has not yet realized that it is better to choose objects that are further away and are not going to be passed soon ... So, we tried a couple word games. Like which words start with ... a certain letter ... Finding a new word that starts with the letter that another word ended with ... stuff like that. Even though this was really hard for my daughter she did seem to enjoy it. But it did not come easy. At some point I got the feeling that my daughter had memorized one word for each letter of the alphabet ... instead of actually being able to hear which letter is in front. We usually could play those games just for a bit until she requested a break. And it usually also was not too relaxing for me.

So I was looking for other things and I came across the idea - I think it is a rather old one - to make up a story. You know ... one person starts and says a sentence and then the other person says a sentence ... and so on. I actually had this kinda game in mind already for a while but had not tried it cause I thought that it would be too hard and therefore too frustrating. But one day I was desperate for something to keep her busy ;-) so I tried it anyway ... and boy, was I in for a surprise! I started off by making up the beginnig of a story and saying a sentence. Then I said "Your turn" and she started chatting away! She would almost not stop! She did not just say one sentence - NO. She kept talking and talking and talking ... when she got stuck she would say "Your turn." I would add one tiny sentence and then she would start again and chat and chat and chat ... It was UNBELIEVABLE! And the best thing - she totally enjoyed it!

Tuesday, April 13, 2010

Look who is peeping ...

This little guy was made around Groundhog Day. So it is ... YES, a groundhog! And I was afraid you might not notice! ;-)


He was not made by me but by my daughter. She stitched all the way around the felt and I think she did a pretty good job! *very proud mom* Okay, I did the ears. But still ... she is only four. I think when I was four I did not even know what a needle looks like ...

I actually wanted to write this post back then but after we had made the little guy and it's grass burrow ... it went for a nap. At least that's what my daughter told me. And never returned! My daughter had - as so often - forgotten where she had put that little guy to nap! GREAT! So this morning I spent searching her room to finally find the poor thing and take some photos. It was quite happy to see the sunlight again. It had spent all that time in a drawer sleeping.

This was not my idea however. I saw a groundhog finger puppet at Skip to my Lou and just adapted it. I found that it was a really easy project for kids. Oh, and fun of course. And the kids do not have to sew. Either you can do that beforehand and they "decorate" or you just glue the whole thing together. You could of course also make other animals. The basic shape can just be a rectangle and you add different ears and stuff.
To make the grassy hiding place we just glued felt around a toilet paper tube and cut it to look grassy.

Just have fun!


Oh, by the way ... the little guy is wide enough to be an actual finger puppet. It was put on a stick just for photography purposes. Way easier than sticking your finger in it and trying to take a photo ...

Tuesday, February 23, 2010

Cardboard play town tutorial

If you have some big piece of cardboard packaging - don't throw it away! Look how much fun your kids can have with it! All you need is:
-big piece of cardboard (the bigger, the better!)
-markers - preferably water proof
-water colors and paint brushes
-optional: smaller cardboard boxes
-wooden blocks, toy animals, cars ... 

On a huge piece of cardboard I drew some streets with a permanent marker. That can actually be done by the kids as well but my daughter wanted me to do it. I just drew a very basic layout and added a store ("Kaufladen").

Then I gave my daughter her water colors and brushes ... and she was busy for a LONG time! :-)


After she was done (you can never be really done - the next day she continued to paint on it) she added her plastic animals, toy cars, building blocks, and cardboard boxes to it and played with it.

Apparently there must be some big sale or something at the store ... the parking lot is pretty packed. Maybe we should send the police over ... that kind of parking is not allowed! We added the blue cardboard box on the upper right hand corner as a garage ... but obviously there are either too many cars ... or it's just too far to walk from the garage to the store ...
I LOVE the red house she painted on the lower right hand corner! So cute!
And that big brownish thing on the left side at the bottom is a lake! I asked her why she would color the lake brown and not blue? Well ... "Because the ducks made poo-poo into it!" Why did I have to ask ...

Friday, February 19, 2010

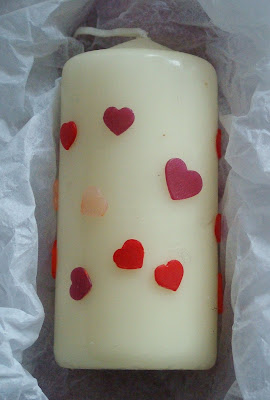
Heart candle

This is another really easy project for kids. All you need are

- candle
- thin wax sheets (you get these in a craft store)
- hole punch in desired shape

All you do is punch the wax sheets so you end up with tiny shaped wax pieces. I left the thin white paper backing on the wax so it would not stick to the hole punch. If your kids are too young to do the punching just make them yourself ahead of time. Then let your kids decorate the candle with them. They just have to put them in place and press them on a little (kinda like stickers). Older kids can even cut out their own shapes from the wax sheets.
My daughter loved that activity and proudly gave the candle to her dad for Valentine's Day. I think it turned out really cute.


Thursday, February 18, 2010

The most important thing in the world ... belated Valentine's Day present

I gave a present to my daughter yesterday that was actually supposed to be for Valentine's Day. I know it was late ... well, with the kiddos being sick and all I simply did not get it done earlier.

My hubby still has not gotten anything from me for Valentine's ... so I guess my daughter can consider herself lucky. :-)

Anyway, I had this blank puzzle lying around. I bought it a while ago with no idea in mind ... and just before Valentine's Day I thought I could paint a world map on it. It would fit great because all the postcards coming from the postcard exchange. And I thought I could add the line "You are the most important thing to us in the whole world" to make it a cute Valentine's present. Well, I think the idea was not that bad. But it certainly did not turn out exactly how I had hoped. And it also was not such a big hit with my daughter.


I used a waterproof marker to paint the outline of the world. And that alone took me (of course with the necessary baby feeding, changing etc. breaks) TWO days! And if anyone of you notices that there are some islands missing - do not tell me! I KNOW! I never really thought that the outline of the world is that complicated. Anyway ... so I had a black and white puzzle. I figured if I use my daughter's water colors and just color it very lightly it would look good. Kind of like a pastel painting. Well, maybe it would have worked if I would have used better paint ... I don't know. But the colors I used simply looked kinda greyish ... so I used less water and more paint ... and so it turned out not pastel looking at all! :-(
Also it is just a cardboard puzzle and with all the water I added while painting - I think it lost some of the stiffness. So now it is rather hard to handle (very fragile). Since it has very many pieces and some of the pieces are just blue - lots of water on the earth :-) - it is basically still too hard for my daughter and she did not have that much fun putting it together. :-( Well, next time I know. With thin cardboard puzzles - do NOT use water colors! And keep the motive rather simple ...
Oh, well ... guess some projects have to go wrong once in a while ...

Tuesday, February 2, 2010

Cute worksheets for kids

Last week my daughter was sick and had to stay home all week. So I REALLY needed something new to at least keep her busy for a bit. While going through my many saved links I came across this site of free worksheets. If you don't know it yet and your kid is into worksheets - mine is and I have no idea why - check it out! It is full of different cute worksheets and all sorted by theme and age.

We did some arithmetic (because we speak German I can unfortunately not use the language worksheets so we had to focus on the numbers). That was great because the last couple of weeks she is totally into adding things.
These dog counting worksheets were a big hit with my daughter. They even have a couple foreign language worksheets. Imagine my joy when I found these German number worksheets!

Btw, if you put the printed out worksheets into page protectors your child can fill them out again and again with a dry erase marker.

Saturday, January 2, 2010

New Year's Wishlist 2010

Just like last year I filled out a wishlist for the new year together with my daughter. Last year I used the printout from FamilyFun (see the old post) but this year I figured I rather make my own. I adjusted the questions to my liking and left some space on top where I can print the year - so now I can simply print out the same sheet each year.

And if you like you can do so as well ... I made one in German and one in English and you can download it (just click on the image and it will give you the pdf-version) and do it with your kids! Have fun!!!

Friday, December 25, 2009

Preparing for Christmas - Advent activities

I know it is a bit late ... but I still wanted to share a few projects I did with my daughter during advent. So here are a couple of photos ... This year we had an actitivity advent calendar so I had chosen an activity for each day. I am not posting pictures of all the activities we did ... but here are a few:


Well, this one was not really a project. The activity was "Having hot chocolate with whipped cream". So this was really easy for me ;-) and it was a huge hit! I would have never thought that such a tiny detail - whipped cream - would make such a big difference to a child. She has never had whipped cream on hot chocolate before ... and certainly loved it. Now she regularly keeps asking when she can have it again. ;-)

One of the activities was baking christmas cookies. We did not make as many as last year cause it's not that easy handling baking, a 4year old and a 2months old at the same time! :-) But these were quick and easy and we like them. I made the dough and my daughter spooned the jam into the holes.

Of course we also decorated cookies (gingerbread).

More cookies? No. This acitivity was making salt dough ornaments. I just realize now that I never took a picture of the finished result ...

But we used some of the salt dough ornaments as embellishments for wrapped packages.

And another baking activity: that day we made cookies for our dog. I used a recipe found on the blog At Home with the Farmer's Wife. I really recommend that recipe if you have a dog. The ingredients are easy to get. The dough is easy to handle. And our dog loved them. Next time I am going to make at least two batches.

More baking? No. I really wanted to make a gingerbread house this year ... but, well, in the end I let go of the idea of making my own and simply used a kit you can buy. It's not very pretty and original ... but my daughter really had fun decorating it and for this year that was the main objective! But I hope next year I will be able to bake one myself ...

We also made a window decoration using trasparency paper.

Another activity was making a mobile as a Christmas present for our baby boy. I gave my daughter craft foam and she drew hearts on it and cut them out.


I put them together to a mobile (also using craft foam flowers we had made earlier this year).

This was also an activity my daughter really enjoyed. We decorated candles with wax stripes. My daughter arranged them in a way so they look like stars. She made a whole bunch and gave them away for Christmas to her grandparents and aunts. We used silver and gold wax on red candles and they turned out really cute. Unfortunately in the photo they do not look as pretty as in reality. :-/

One day we made a sock snowman. My daughter also LOVED this. It was actually meant to be used as a decoration in her room but she plays with it. (The snowman is sleeping in the doll bed at the moment.)

We made more snow men. This was also lots of fun and really easy and quick. I got the idea from Coley's Corner. She has a whole tutorial over there and shows how to make them.

I changed them a bit and used crepe paper (hope this is the right term) instead of baby socks. Also I did not use buttons but black circles cut out of paper. And we added a "scarf" - to do so we simply used ribbon.

My daughter gave these to her kindergarten teachers as Christmas presents. She was really proud of them and actually drew the faces herself!

Friday, September 18, 2009

Magnetic weekly planner for kids

I had this project in my head already since AGES ... so I am very pleased that it is finally done! I wanted to make some kind of weekly planner for my daughter where I could put down things like
-going to kindergarten
-activities we are doing
-certain "routines" we have (like having eggs for breakfast on sunday)
-when daddy is not working from at home
....

Lately she started referring to the different days of the week by their names and often wanted to know whether something was going to happen on "Monday" or "Wednesday" or ... However, she still has alot of trouble remembering what day of the week it is and what will come next so I thought this might help her to get it all in some kind of "order" eventually. At first I was thinking of making a timetable (which would have taken less time I suppose) but since we don't have a really rigid schedule and like to change things according to weather, liking, time ... whatever ... I figured a timetable would not really work. So I made magnets to use at our fridge which are arranged kinda like a timetable.

(If you click on the picture it will enlarge and you can see the magnets more closely.)

I was thinking alot about what to use to make the magnets. You could use pretty much anything ... fabric, felt, laminated paper, wood, polymer clay ... In the end I settled for simple coloured crafting cardboard and added magnetic foil to the back. It's comparably cheap and you can easily add or replace magnets if you need/ want to.

I simply made magnets with the weekdays (Monday till Sunday) and arranged them on the fridge in a row. (As I am German I used the german words of course.) I colour-coded them in making Saturday and Sunday red. Then I made round magnets which stand for certain activities, like
baking - cupcake
crafts - scissors
going to the library - books
going to the playground - swings
....
I just printed small cliparts and coloured them (only have a black and white printer) and glued these to round cardboard pieces. That's it.
I am planning on writing down the activities onto the round magnets as well in the future (just was a bit too lazy for that at the moment). And once she actually starts reading I will probably replace the pictures with just words. I love that you can really easily adjust this planner to any needs that you might have.
(For older kids that are learning a second language you could even make it in another language.)


I also included the months and seasons. They are again colour coded. So summer is yellow and all summer months are on yellow cardboard. Winter is white, fall brown and spring is green. I am planning to include the date as well - so I will make some number magnets. But I did not want it to get too confusing for now and I thought the date would be a bit too much at the moment. So I will do that later once my daughter mastered the weekdays and months.

I am planning on going over this planner with her each day and talking about which day it is, which day is tomorrow (and was yesterday), what we are going to do today ... and the rest of the week. She can pick out the magnets - which she loves!!! Couple days ago during the day I told her that we would have to go shopping if we want to bake something (we were not at all talking about the weekly planner or anything) and her reply was "We will have to put the shopping cart on the planner!" :-)
And another advantage it has - it also kinda breaks down the week for myself and I it is easier for me to keep track of what activities we do. It has happened in the past that we ended up colouring for days in a row, which is fine as long as my daughter enjoys it. But sometimes I am just at a loss about what to do the next day and she also seems not too satisfied with her choice. Now I can just ask my daughter what she would like to do and actually seeing her options visually in front of her makes it alot easier for her to choose something! Before she would often tell me the same activities over and over again ... Now she also picks out activities that we rarely did before (like cooking together for example). So far it really is working very nicely!

Thursday, September 17, 2009

DIY-whiteboard/ dry erase board for kids

Lately I was thinking of buying a chalkboard for my daughter. She loves drawing and writing and she seems to like it even more, when she can erase things again. She has a small chalkboard already - but it is really tiny. So I was thinking of getting a bigger one to hang at the wall in her room. I was however not too keen on all the dust chalk would bring into the room .... so I was thinking about an alternative. I figured maybe a whiteboard would be a nice way - no dust. Still can erase stuff. So I was already checking for offers and prices ... when I happened to stumble across this post about a picture frame dry erase board at the blog Make it and love it. I thought what a great idea. And it would probably turn out MUCH cheaper than buying a dry erase board. Only thing was - I did not really want to hang a big glass frame into my kid's room ....
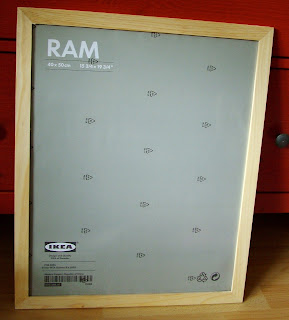
But I knew that I could buy large picture frames that have no glass but some kind of plastic instead. I was not sure whether it would work - but I was eager to try.

So I bought a large wooden frame with plastic instead of glass. I made a mark on the plastic with a dry erase marker - and even after one day it was easily erased with a bit of felt.
(I am not sure though whether it depends on the kind of plastic used or whether it works on all plastic material. I know that on some page protectors - which I have used with dry erase markers - the erase marker actually cannot be erased anymore after staying on for too long.)
So there was nothing in my way to make my daugher her own dry erase board!

It's really easy - if you want to make one too all you need is:
-one picture frame with plastic instead of glass in desired size

optional:
-paint
-fabric
-anything else to embellish
-print outs

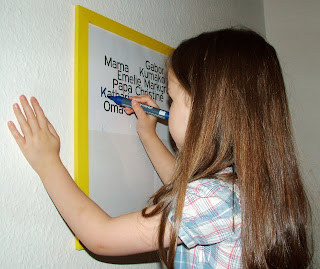
I painted the frame yellow. But you could either buy a frame at your desired colour or embellish it any other way you can think of.

Inside the frame I just put a white paper and some printouts, that I plan to change once in a while. (At the moment there are several names in there and a traceable alphabet.) But you could put in there some kind of fabric or some paper in another colour. You could use printouts of numbers, mazes, pictures, letters .... well, anything that your child might like to trace or to complete (like "connect the dots" pictures) ... The possibilities are really endless!


As you can see my daughter likes the board. She loves playing "school" at the moment so I think it will be a big hit ...

Thursday, September 10, 2009

Sewing for kids


Actually, I never would have gotten the idea to give my daughter needle and thread. I thought that must be way too hard for a 4year old. But then I read this post on Sew, Mama, Sew! and thought, "Maybe I'm wrong." (You really should check out that post if you have kids. I think the ideas are just adorable.) So I searched for an old embroidery hoop, some VERY old (and may I say rather ugly) embroidery fabric, a needle (which is not sharp) and thread. When I asked my daughter whether she wanted to sew she was instantly very keen to try. I was not sure how it would work out. I had made her lacing cards before but she lost interest rather quickly. So I gave her the hoop with the fabric and she started stitching away. Oh, first she inquired - several times actually - whether the needle really was not sharp cause obviously she was very afraid to hurt herself. And once she started I was amazed what a good job she did. I have not seen her work that concentrated on something in quite some time. Lately it actually has been really hard to come up with projects to do with her cause she either was not interested in trying right from the beginning or shortly after we started a project. She would loose interest so quickly - I really had to swallow hard and try not to get frustrated some times. But with this ... she was just sitting there for a really long time and stitching! After dinner she requested to sew some more ... It was really so much fun to watch her! And it was very nice sitting together on the sofa - she stitching away while I was knitting! Really cool!
I am thinking of getting some prettier fabric for her to stitch on ... so we can make something out of it and "save" it. Maybe I even get her to work with a "real" (meaning sharp) needle - which would make the fabric choice a bit easier ... And I definitely love the idea to make festive banners in the post by Sew, Mama, Sew! Maybe we'll try this next.

Tuesday, September 1, 2009

Chocolate marshmallow muffins


Yesterday I made muffins with my daughter - just because of it. No special reason. We tried a recipe from a book for chocolate marshmallow muffins. I think they look declicous. (Sorry, I would love to print the recipe - but I don't want to violate any copyright regulations.) The taste was alright - but not overwhelming ... so I am thinking I will try to make up my own. (Of course they will contain MORE marshmallows and MORE chocolate!) If it works out I will post the recipe. (Might take a while though.)

While making the muffins though I realized baking muffins is really a great activity for kids! Lot's to measure, to cut, to stir ... oh, and to taste! (Not the dough itself of course, but chocolate, marshmallows or fruit ... depending on the kind of muffin.) And you don't have to hurry as long as you have not mixed up the dry parts and the liquid parts of the dough yet ... so you can take your time. (Which really bothers me with some cookies doughs. If you handle them for too long they either get too dry or too soft.) My daughter loves to put the paper cups into the baking dish. And she loves checking on the muffins when they are in the oven. Well, and she loves to eat them ...

Saturday, August 1, 2009

Painted cup

This is what my daughter made for her daddy for his birthday. It is actually a very nice thing to make even for younger kids. All you need are

-white or light coloured table ware that is oven proof
-porcelain colour

The porcelain colour comes either as a pen or in small glasses that you use with a paint brush. It simply depends on your or your kids' preference. We used a red pen for this project simply because we had it laying around from an older project. When my daughter was about 2 1/2 years old we used such pens to make cups to give away at christmas. Basically she scribbled with different colours on white cups. Too bad I did not take any photos back then of the results. I found them rather sweet. Now she can do already a bit more than just scribble. So she wrote "daddy" - in german of course - all around a huge cup and even drew a couple of hearts.
I liked the result so much that I told my daugher I would like her to make a cup for me, too. She responded that she could do that but I would only get if for my birthday. And I would have to tell daddy first where I bought the cup so he could go and buy one for me, too. She really had it all planned out ... ;-) (Now I only need to convince daddy ...)

It is really a nice project for kids. You simply draw something on the table ware. (You might want to protect the work surface as the pens sometimes splash around a bit.) As long as it is not baked you can also remove the paint again (just wipe it off) and redo bits. After you are done you let it sit for a while to dry and afterwards you bake it in your oven. DONE!

(If you are wondering - the brown bits on the inside of the cup are just coffee. I took the picture just after it was used for the first time and simply forgot to rinse it before. I was a bit worried that the writing would not survive the dishwasher since the pen had been laying around for quite some time. But after the first ride in the dishwasher the cup still looks fine!)

Monday, June 29, 2009

Playdough

If you ever want to make playdough - use this recipe from the blog My Montessori Journey. (There are even some really neat ideas for montly themed playdough!) I made this dough today and it turned out BEAUTIFUL!!! (And it was REALLY quick, too!) I have only made playdough once before - Chocolate playdough. I really liked the chocoalte one - but this one is even better. Well, of course it does not smell as good as chocolate. But it is so smooth and - which I like best - NOT STICKY AT ALL!!! Really great. I am very curious to see how it will keep up when stored for a while.
I tried the recipe simply with red food colouring (my daughter chose) and gold glitter. (You have to look really close to see the glitter in the photo.)


I am not the "glittery type of person" usually. But I wanted to make glittery playdough as part of a "treasure" for my daugher's birthday treasure hunt. I think it turned out well ... Am not too sure yet whether I will make the playdough for the birthday party in yellow with glitter or in different colours with glitter ... But at least I know now which recipe I will use!

Thursday, May 7, 2009

Chocolate play dough and home-made pop tarts

Another busy day today. After a visit to the pediatrician I bought some cream of tartar and we finally tried a recipe for chocolate play dough I found on the blog The idea room. The dough turned out really great! It smells fantastic* and has a really great texture! My daughter was busy for quite a while. Actually long enough for me to make some "real" dough and bake some pop tarts. The recipe was written down at Bake me more. As soon as I saw it I knew I had to make it. From my time in the US I know pop-tarts, like them, but if you do get them overhere they are SO overprized! So I haven't had them in years!
I think for a first attempt with pie crust they turned out pretty well. But I have to try to roll the dough even thinner next time.


*I have to admit that I was a bit worried to give play dough to my kid that would smell and feel like chocolate dough. What if she tries to eat it?! Well, I can say the dough is pretty safe if it comes to being eaten. If your child will try to eat it - he/she will only do it once and you will instantly know! How do I know? No, my daughter did not try it ... Let's just say the door bell rang while I was kneading the dough and I got a little distracted .... *very yucky*

Wednesday, May 6, 2009

Stuff to keep the kid busy

So, my daughter has been sick since Sunday and I had the privilege to stay at home with her since Tuesday. I was quite happy not to go to work. Since I am pregnant I rather dread working since I never know how well I will feel during the day. So I rather like to stay at home ... close to everything that will satisfy all the food, drink or bathroom needs one pregnant woman could have. I was especially pleased since my daughter was not THAT sick anymore - so no taking the temperature every hour or being terrified whether she might throw up or something. I figured we would have some nice quality time together. Well, ... turns out that you need ALOT of energy to keep a kid busy all day. :-)
So by now I am pretty much very desperate and trying everything I can get my hands on which might keep her busy for a couple more minutes. Don't get me wrong - I love reading to her! Which is her favourite past time so it seems to me. But not all day every day!!! Sorry, I am just not THAT patient.

So yesterday we finally finished a project that we had started already a while ago. I do not remember where I got the idea for this one from. So if anyone knows where this project is described please let me know. It's really easy to make. All you need is round filter paper. (I hope that is the correct term - am not sure. It's that kinda paper that you use when making coffee with coffee powder.) You let your child colour it. Afterwards you - or your child - cut some of the round papers in half. By attaching the half pieces to the round pieces you can make fish. Yesterday my daughter coloured onto a big sheet of paper a sea and we glued the fish into it. Since my daughter used pretty much the same colours for the fish and for the sea the fish do not really stand out very much. But I guess in nature that would be perfect. Those would probably be the fish that lived the longest ... no predator would ever see them ... :-)

Today I was very keen on trying this modeling clay recipe I found on Sweet thing(s). It is basically like play dough but you can let it air dry and it hardens.
I am not sure if I did something wrong .... trying to talk on the phone with my mom, helping my daughter to dress up as a witch AND trying to measure the salt for the recipe at the same time probably is not the best idea ever ... when I stirred all of the ingredients together the stuff instantly turned to a thick mass and I was unable to stir any longer. So I decided it might be done ... and let it cool a bit. We made some stuff out of it which is drying at the moment. Am very curious how it will turn out. Good thing is - as you can paint it after drying this will hopefully provide even more busy minutes! :-)


Also I tried to make a pin wheel out of foam sheets today. I had the instructions for it in a craft book ... oh well. I thought it should be something that is easy to make. Well, it probably would be, if you actually do follow the instructions and have all the supplies needed. As usually - neither of it applied to me! So now we have a very cute looking pin wheel - that unfortunately won't really spin ...

I decided the next pin wheels I will make are going to be from paper. It'll will be much easier (and cheaper in case I mess up). I just need to get some sticks ....
Here are some pages with instructions if you want to join me. :-)
Apartment therapy
Martha Stewart
Heather Bailey
Related Posts with Thumbnails