Showing posts with label crafts. Show all posts

Wednesday, October 12, 2011

Enough of the quietness - and Fairy birthday inspiration

I have not posted in soooooo long!!!!

And to be honest - there was not really a good enough reason for such quietness on my part. After the last post things got busy. But not more than usually. And I was used to going back and forth between times of business and times of more quietness ... 

So I waited for the more "quiet" time to start. 

And waited ... and waited ... and waited ... 

Weeks passed and I realized that this is not a busy phase ... this is it! It kinda freaked me. I missed posting here. But I hardly managed the German blog ... and everything else. I kept telling myself ... oh, I will write something next week. But that never happened as there were new things always going on ....
So, all I can say - I have missed you guys! Seriously! 

And I am sorry for being so quiet for so long!

And especially thanks to some of you who checked in ... will get back to you!

I will try to start up again and write here. I love this blog of mine and I love hearing from you guys! I miss sharing things I make with you. And I also miss reading all your blogs. 

I will not be able to write as often as before and to be honest I still have no real plan yet how I will do it - maybe I try a "once the week" post or something. Not sure yet. I will have to figure it out along the way. 

I just realized if I wait until I have a plan ... it will never happen! *laugh*


So today I will start off and share a few of the things I made for the fairy birthday party of little bear (which was in summer).


First of course there was a huge 

fairy castle cake. :-)


And for the kids party there where 

toadstool mega-muffins 

And I had acutally sewn 

leaf shaped pillows

to sit on!
Talk about crazy and having no time! :-)


My daughter had wished for a 

birthday crown

So I made her one out of felt ... decorated with some handmade heart-buttons:

 
"Feenkrone" is fairy crown in German. :-)

One of the buttons:


And last - but not least - there was a 

fairy! ;-)


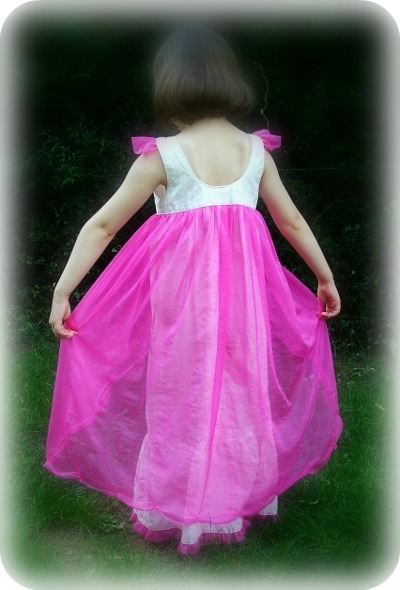
I made her the 

fairy dress

according to her instructions! 
And believe me - a six year old can have surprisingly precise ideas about how her fairy dress has to look!!!!


I love her so much!


And huge thanks to Lorraine for helping me with making the dress!!!! 
Your input was unbelievably helpful!


Wednesday, March 23, 2011

ABC-board thingy ... with tutorial

As promised finally a proper post again. I am sorry for so much quietness. After my last proper post first my little one was sick. Then there was so much to do that there was hardly any time for blogging at all. And then the Japan-thing happened ... and I felt so weird. Whenever I sat down to write a post I could not ... somehow whatever I was going to write felt so unimportant ... I guess I was just in a very strange mood.

I actually got a few things that I wanted to share already for a while. I war not quite sure where to start ...

So first I show you something that I made for my daughter. 
She is 5 and she know all the letters already for a while. She just started to read properly a bit ago. But even though she knew all the letters she could never remember the alphabet. I was not too worried about that - but still I figured if I could make something where she could SEE the alphabet that might help. She has an alphabet poster ... but I wanted something that would show the alphabet in a row. So I made this quick and fun project


I made an ABC -board

Or what would you call it?
A rail? Or ... I am a bit lost about a name.

Anyway, it was fun. And quick. And you do not need much. And - it worked. Ever since I hung up that thing in her room she knows the whole alphabet. In order! :-)
Am so proud!
And happy!

So if you happen to have a kiddo that is about to learn the ABC and want your own ABC board thingy ... I wrote down how I did it.

This is what you need:

- wooden letters
- acrylic paint
- a long wooden board
- glue

And this is what I did:

1. I used really cheap self-adhesive wooden letters that I scored in the 1Euro section of one discounter. But you can of course use really fancy ones, too. 


If you use big letters I would recommend sanding them. But to be honest - I did not do that. Do not tell on me! 

2. After you did - or did not - sand your letters ;-) you paint them. Easy! And fun!


After you put a coat of paint on them let them dry. 

3. If you like your letters that way you can already hop on to step 4. But I wanted to make mine a bit more colorful so I added some more paint and ended up with this:


That was SO MUCH FUN!
Let dry again.
4. Get your wooden board and - depending on what it looks like - you might want to put some paint on it, too. After it is dry you glue the letters in place. 
And that is it! 
DONE!


Admire your work a bit more .... ;-)


By the way, this project is really easy to customize.
You could hang the letters pretty much any other way you can think of. 
I actually had this idea that you could make letters and put them into colorful circles to the wall. Kinda randomly scattered around. It would of course not help with learning the alphabet - but it would sure be a really cute decoration! If you like letters that is. 
I do! :-)
And you could play "I spy" with letters ... I figure that would be fun ...

Oh, and here is another treat for you. I found this a while ago and thought it was cute. 


To me it is not much use yet as my daughter is not learning English yet. 
But once she is I think I will print it. So cute!

Hope you enjoyed this!
Have a lovely day!!!


I am sharing this here:

Wednesday, February 9, 2011

Folded stars

January is over ... and I have not even posted ONE 

Bad!!!
So here it comes ...


I actually made these already a while ago. But somehow finding the time to type up posts becomes harder and harder.

Well, just shortly before Christmas ... and during Christmas actually ... I learned how to make these folded stars. 
They are made out of square papers and are just folded - and stuck together. 

You have to fold 30 pieces of paper. 

In Germany they are called Bascetta-stars. 

Anyone can tell me whether that is the same in the rest of the world?


This one is a star made out of special paper that has different prints/ colors on both sides. 
It looks really pretty, don't you think?

After I had made this one I was out of the pretty paper ... and I figured I could ge a bit inventive ...
So I ended up using this:


This is a rather old book with musical notes.


I love musical sheets. 

So I had to try whether it would look good. And this is how it turned out:


I totally adore it!


And as you have to cut the pages to squares there is always a paper strip left over. So what did I do?
I cut squares out of the left over bits ... and made a tiny star:


Here you can see both together:


This was so much fun!
I am actually working on another recycled star. 
No musical sheets though ... curious? ;-)
But it might take a bit until it is done ...


The folding and the putting together is really relaxing ... but the cutting of the squares is simply booooooring! :-)


Katie's Nesting Spot     


Tuesday, December 21, 2010

Homemade Snowglobes


Yes, you guys were right! 
A penguin snowglobe!!! 
I love it! 
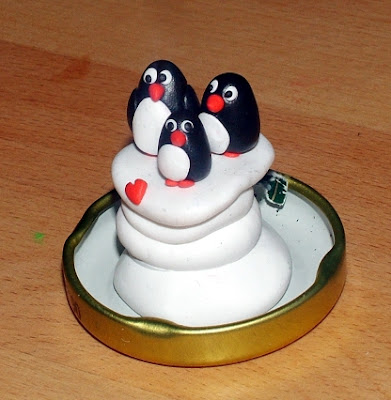
This is the one I made. It is teeny tiny. I will show you again when it is finished. Have to harden it ... and put it all together ...


But wanna see what my daughter made?
Remember, she is only 5 years old!

 I think it is completely amazing!!!


And I swear - I did not touch her stuff once!!!
She did ask me how to do things and I would say stuff like "Try to make a ball first and then make an oval" ... or stuff like that. But other than that - she did it ALL BY HERSELF!


I love the bird she made!
And the sweetest thing ever:
She told me that she wants to give it to her little brother as a Christmas present!
She is such a darling!


Well, back to frantic sewing. Finished a skirt! Hooded scarf almost done. Stickhorse still to be made. Think am going to skip the owl mobile ...
Now I KNOW why it always sais "Santa and HIS LITTLE HELPERS ..." 
How on earth did I think I could pull off making presents withouth them????
Also still baking and cleaning to do. 

Note to self: Stop thinking!!!! You are just gonna freak! SEW!!!!!

Related Posts with Thumbnails